White Chocolate Raspberry Dream Cake
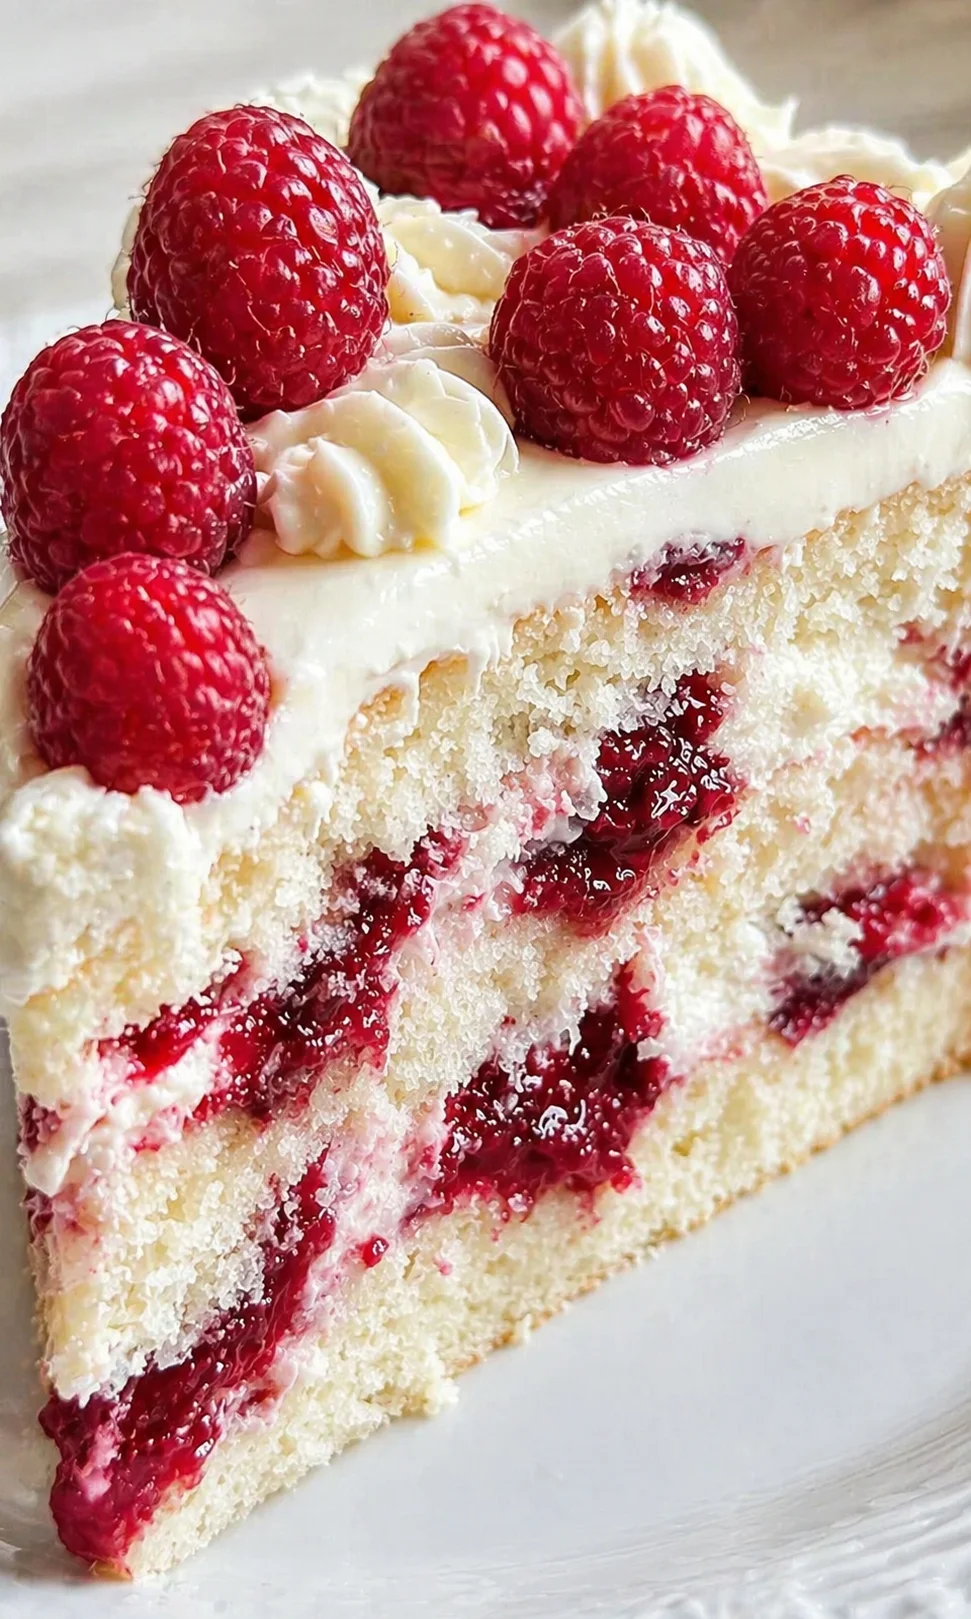
When you think of dessert moments that truly delight your senses, the White Chocolate Raspberry Dream Cake stands out as a total showstopper. Imagine tender, moist cake layers soaked in creamy white chocolate, perfectly paired with swirls of sweet-tart raspberry filling. This isn’t just a dessert—it’s a full-on flavor party that leaves a lasting impression! White chocolate has this magical way of boosting any dessert’s richness and creaminess, and this cake brings that to the table in spades. It’s a wonderful recipe that brings families together, creating a stunning centerpiece for any occasion. Whether you’re an experienced baker or just starting out, this cake is straightforward, quick, and guaranteed to wow everyone around your table.
If you’re a fan of classic chocolate cake, this recipe offers a fresh, exciting twist that’ll elevate your baking to a new level. The White Chocolate Raspberry Dream Cake is more than just a dessert—it’s a celebration of taste and texture, combined in one beautiful treat. So, slip on your favorite apron, and let’s get this delicious adventure started while your kitchen fills with heartwarming aromas!
Wondering why this cake earned the dreamy name, White Chocolate Raspberry Dream Cake? It’s not just because it looks like a slice of heaven, but because every bite tastes like a little piece of cloud nine! The luscious white chocolate and the bright, tangy raspberry come together in such harmony that you might find yourself daydreaming about it long after the last slice is gone. Have you ever had a dessert that makes you smile from the inside out? This is that cake! They say the way to someone’s heart is through their stomach, and this cake could very well win over a whole room full of hearts. Why not give it a try and fill your family’s day with sweetness and smiles?
The White Chocolate Raspberry Dream Cake brings together creamy white chocolate, fresh raspberry filling, and soft, tender cake layers in a treat that’s special-looking but absolutely doable. This recipe strikes a wonderful balance between sweet and tangy, resulting in a centerpiece that’s perfect for family meals, celebrations, or anytime you want a stunning dessert without the fuss.
Keep reading and you’ll get all the details for baking this with confidence: an ingredient list with exact amounts, simple step-by-step instructions, helpful tips to avoid common mistakes, and smart advice about storing and freezing. Plan on spending about 50 minutes of hands-on time mixing, baking, and frosting, plus extra for the cake layers to cool and chill between frosting coats.
- Who it’s for: bakers at any skill level—these straightforward directions lead to an elegant result.
- What you’ll get: rich white chocolate buttercream, lively raspberry filling (seeded or smooth), and a smooth, beautiful finish.
- What’s included: detailed ingredient list, step-by-step guide, pro tips, flavor swaps, storage and freezing help, plus a troubleshooting Q&A.
So, grab your apron—the next sections will walk you through each step, so you can bake this dreamy cake with ease and confidence.
Why You’ll Love Every Bite
There are three big reasons why this White Chocolate Raspberry Dream Cake deserves a permanent place on your dessert table. First, the combination of flavors is nothing short of magical. The creamy white chocolate blends perfectly with the fresh-tasting raspberry for a dance of sweet and tangy on your palate. If that sweet-tart contrast is your thing, you’ll also love our Rhubarb Bars with Cream Cheese.
Second, making this cake at home is budget-friendly and satisfying. You control the quality of ingredients and save some cash compared to buying a fancy bakery cake. Plus, there’s something extra special about sharing a homemade treat with your loved ones.
Finally, this cake is wonderfully versatile. Dress it up with fresh raspberries or a drizzle of chocolate sauce, or keep things classic and elegant. It’s a recipe that welcomes your personal touch—kind of like our soft, chewy easy sugar cookies that turn simple ingredients into something unforgettable. So, why not roll up those sleeves and make this delicious delight? Trust me, you won’t regret it!
What You’ll Need
- 2 cups all-purpose flour
- 1 cup granulated sugar
- 1 cup unsalted butter, softened
- 4 large eggs
- 1 teaspoon vanilla extract
- 1 cup milk
- 2 teaspoons baking powder
- 1/2 teaspoon salt
- 2 cups fresh raspberries (or frozen, thawed)
- 1/2 cup sugar
- 1 tablespoon lemon juice
- 8 oz white chocolate, melted and slightly cooled
- 1 cup unsalted butter, softened
- 4 cups powdered sugar
- 2 tablespoons milk (or more if needed)
Baking and Assembly Steps
- Preheat oven to 350°F (175°C); grease and flour two 9-inch round pans and line the bottoms with parchment paper.
- Beat softened butter and granulated sugar until light and fluffy (about 3–5 minutes), then add eggs one at a time, beating well after each; stir in vanilla extract.
- Whisk together all-purpose flour, baking powder, and salt in a separate bowl.
-
Add the dry ingredients to the wet in three parts, alternating with the milk, stirring gently after each addition until just combined.
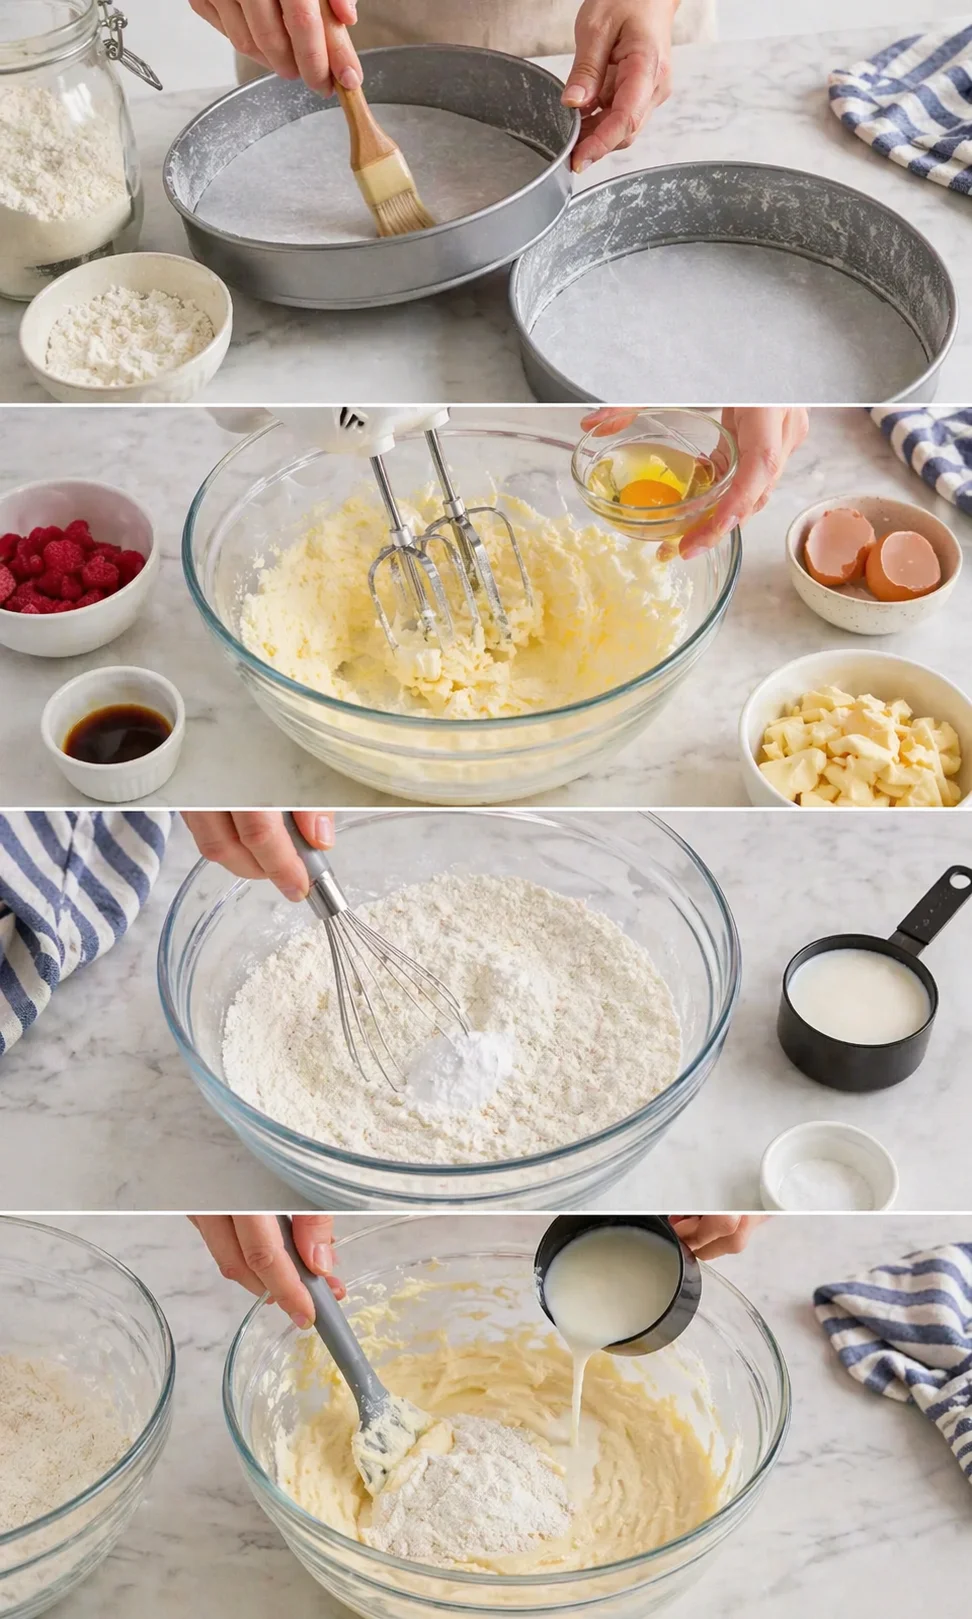
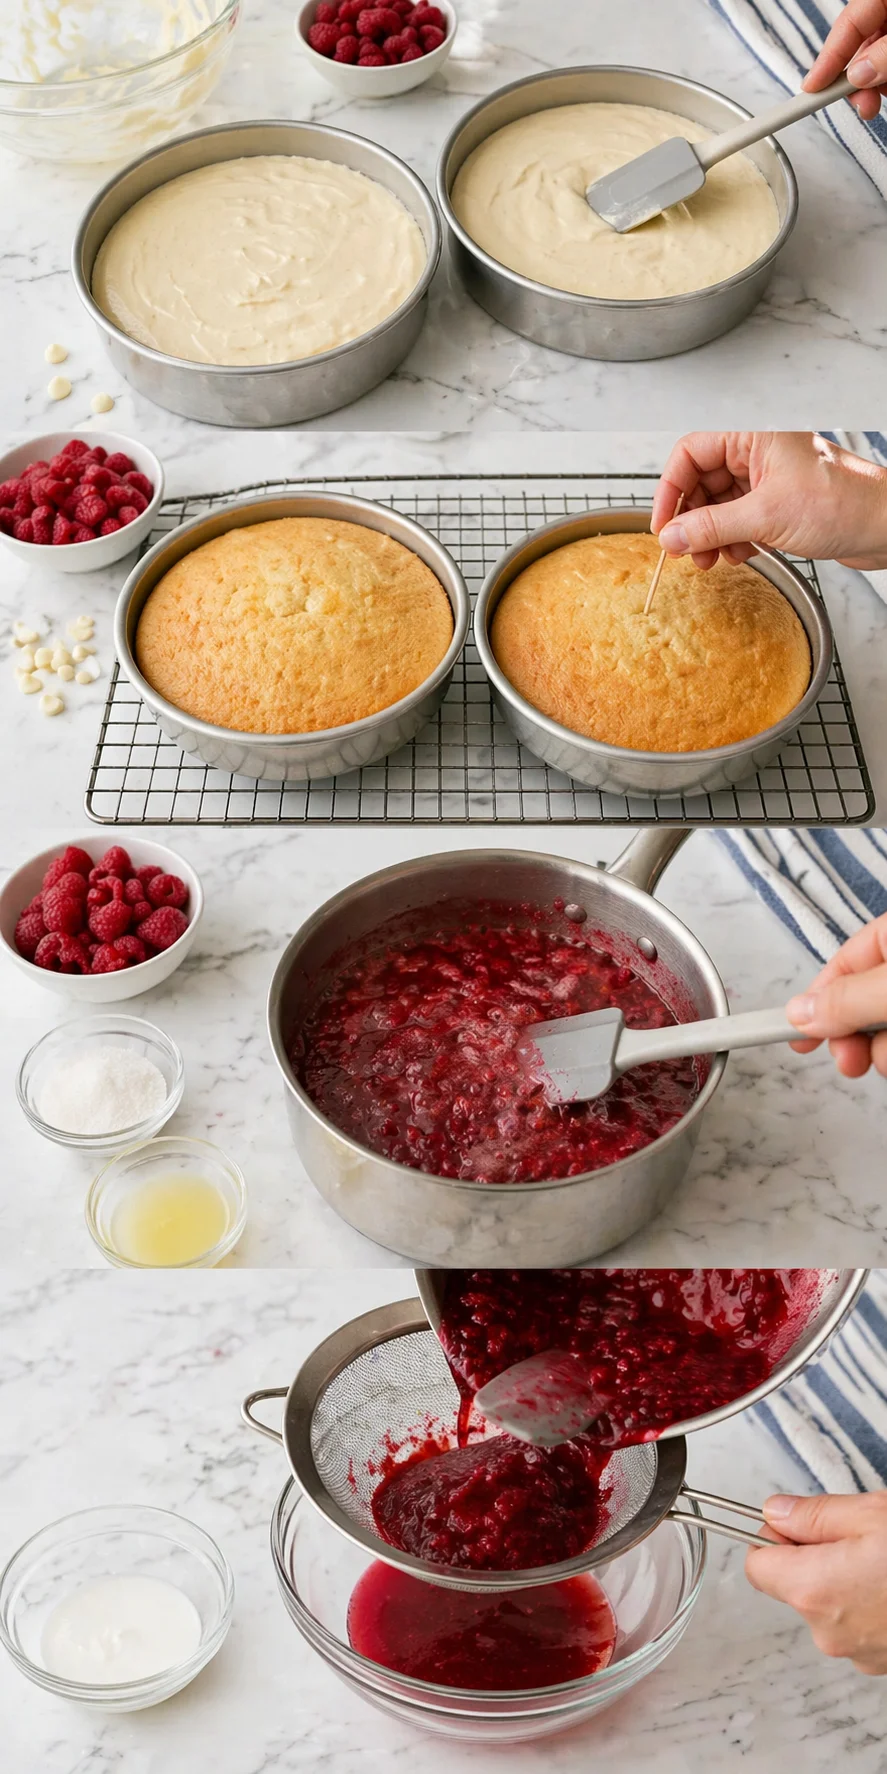
- Divide the batter evenly between the prepared pans and smooth the tops.
- Bake for 25–30 minutes, testing with a toothpick until it comes out clean or with a few crumbs; let pans cool 10–15 minutes, then transfer cakes to a wire rack to cool completely.
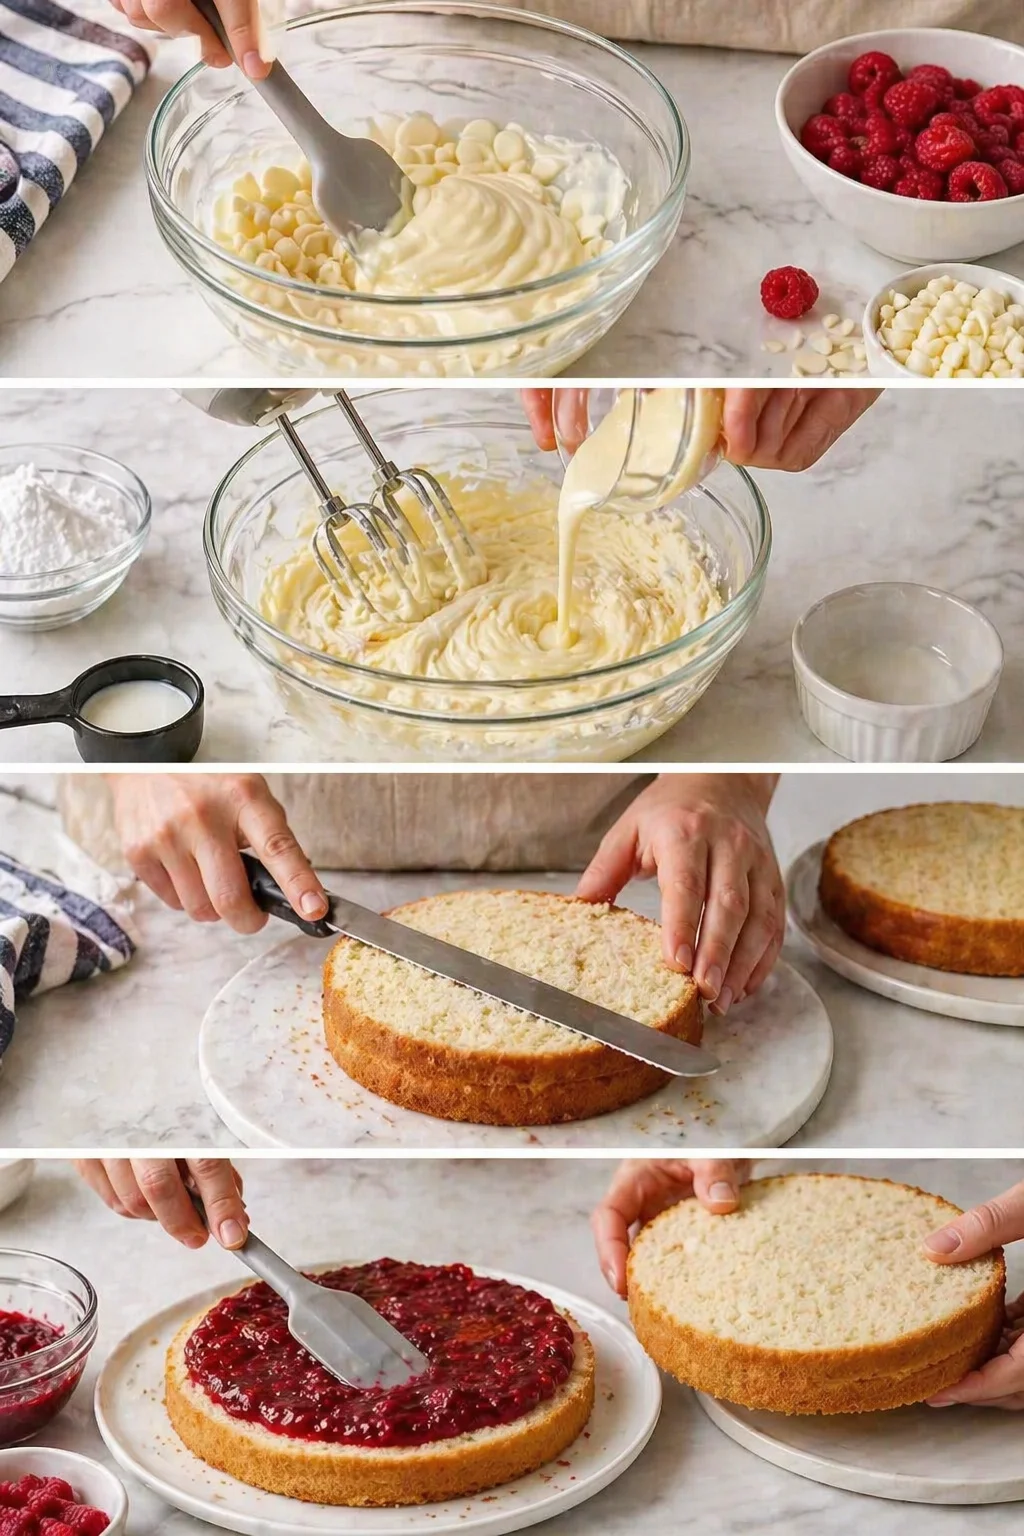
- Combine raspberries, sugar, and lemon juice in a saucepan and cook over medium heat, stirring occasionally, until the fruit breaks down and the mixture thickens (about 5–7 minutes).
-
For thicker filling, stir in 1 teaspoon cornstarch mixed with 1 tablespoon cold water and cook 1 more minute; for a seedless filling, press the cooked mixture through a fine-mesh sieve; cool completely.
- Melt white chocolate gently in the microwave (stirring every 15–20 seconds) or over a double boiler and let it cool until warm but not hot.
- Beat softened butter until creamy, gradually add powdered sugar, then mix in the cooled melted white chocolate; if the frosting is too stiff add milk 1 teaspoon at a time until fluffy and spreadable, and if it looks grainy let the chocolate cool more before mixing.
- Level domed cake tops with a serrated knife if necessary.
-
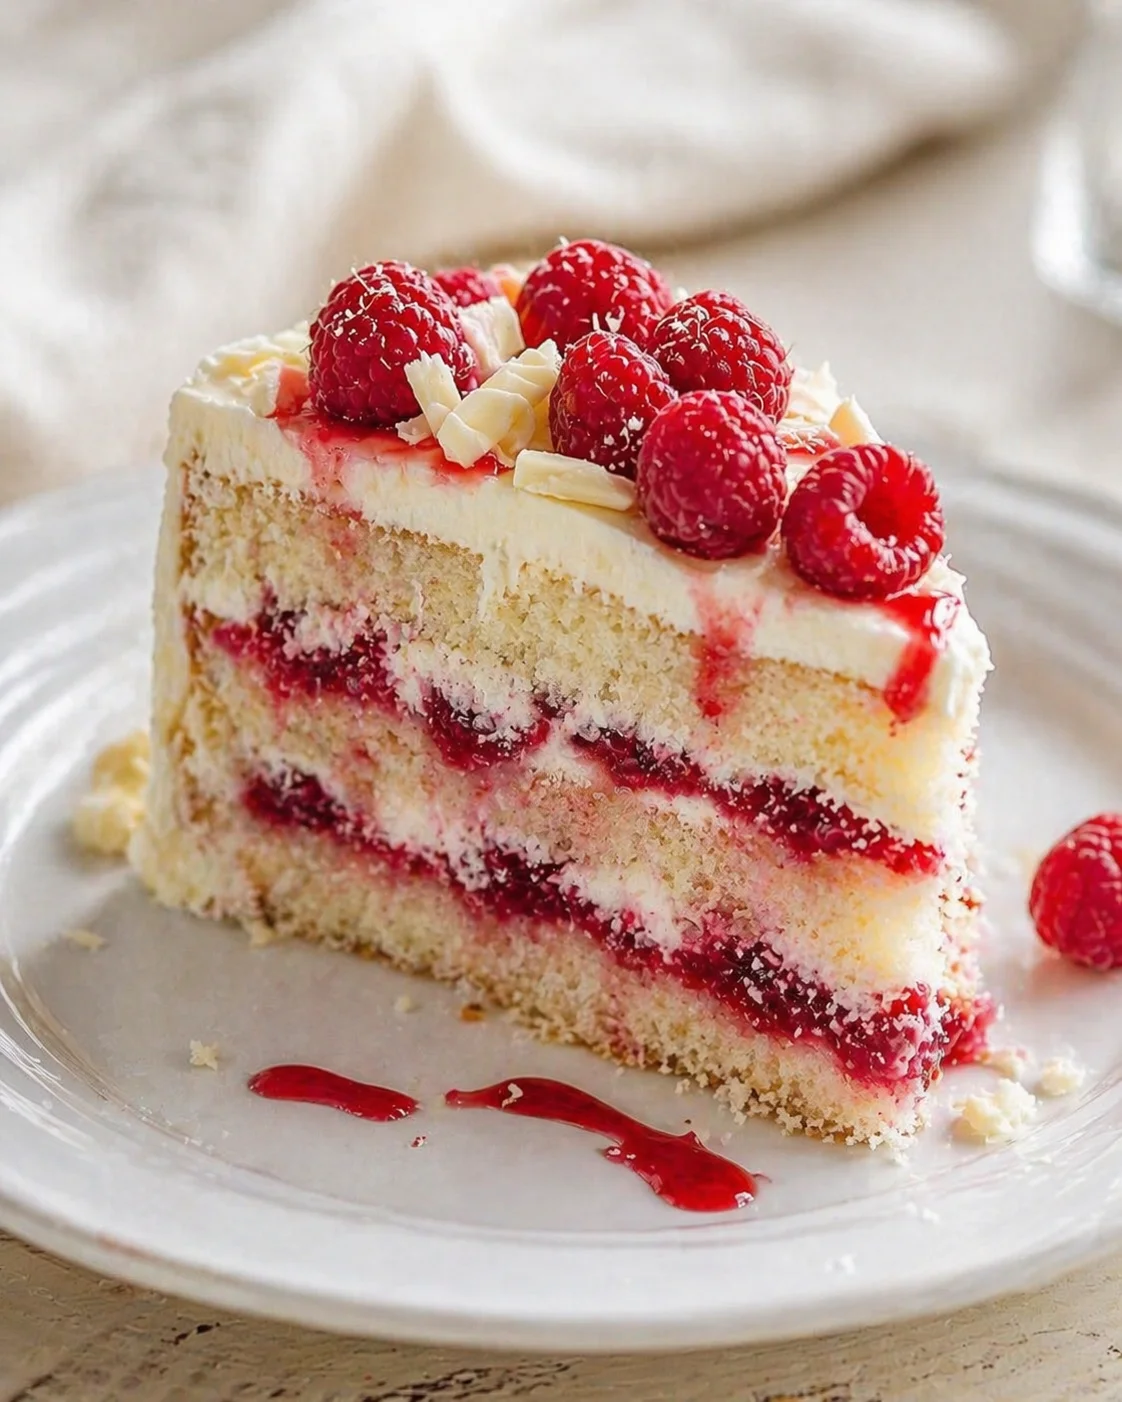
Place one cake layer on your serving plate and spread half the raspberry filling evenly on top, leaving a small edge; place the second layer on top and press gently to level.
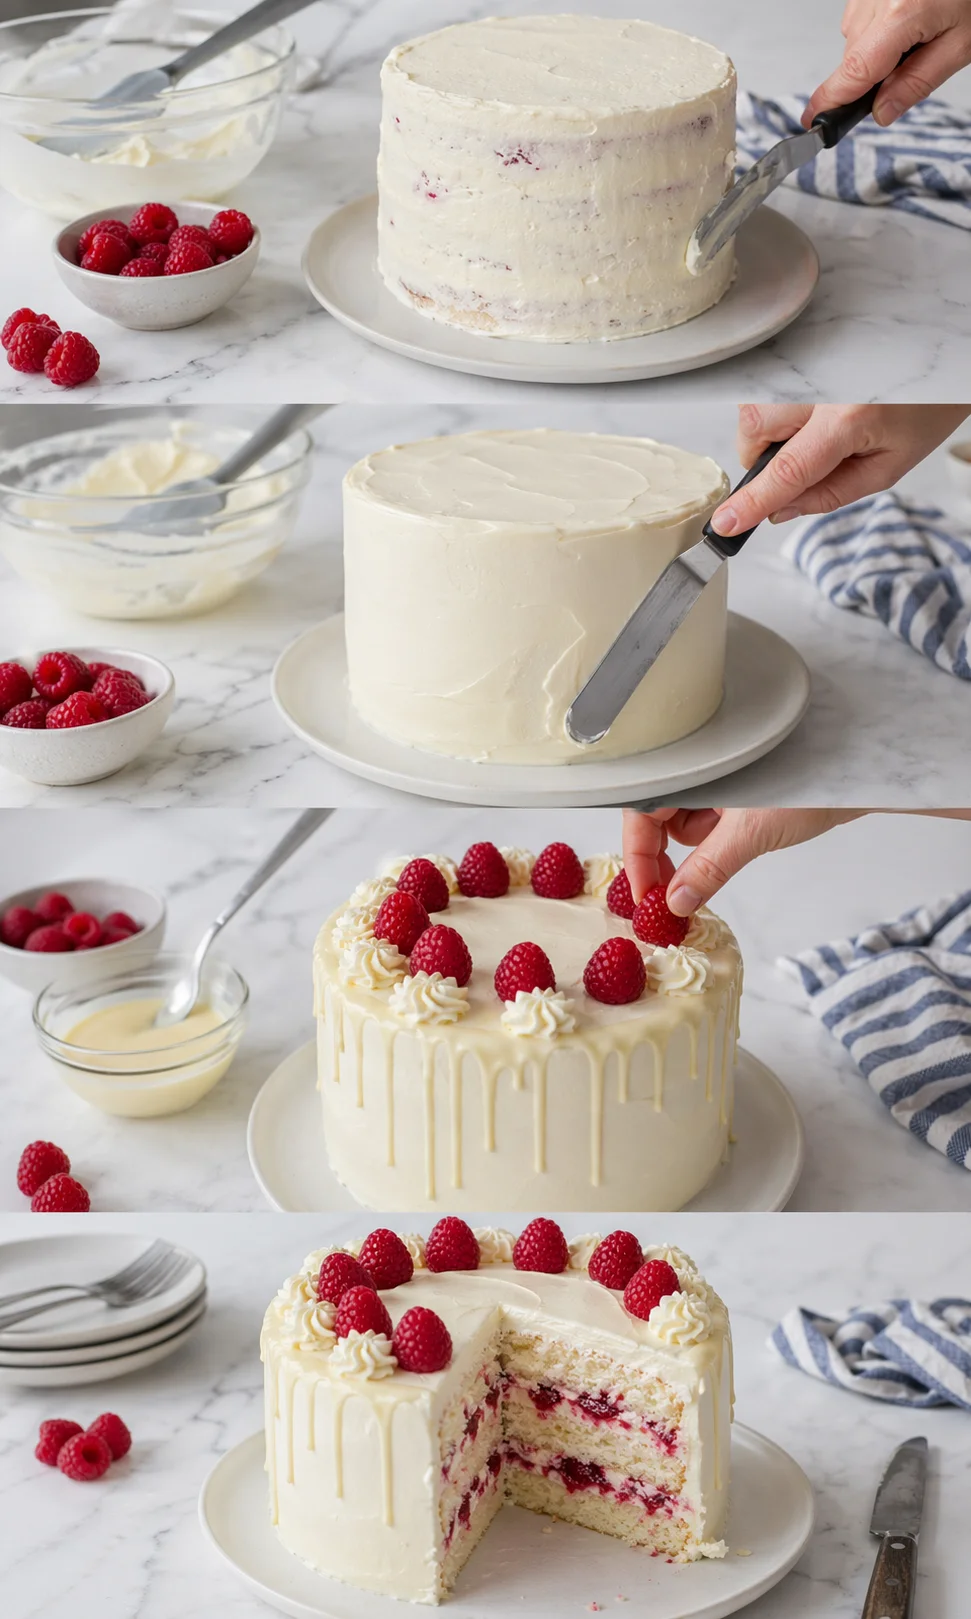
- Apply a thin crumb coat of frosting over the entire cake to lock in crumbs, then chill in the refrigerator for 20–30 minutes.
- Apply the final layer of frosting with an offset spatula to achieve smooth sides.
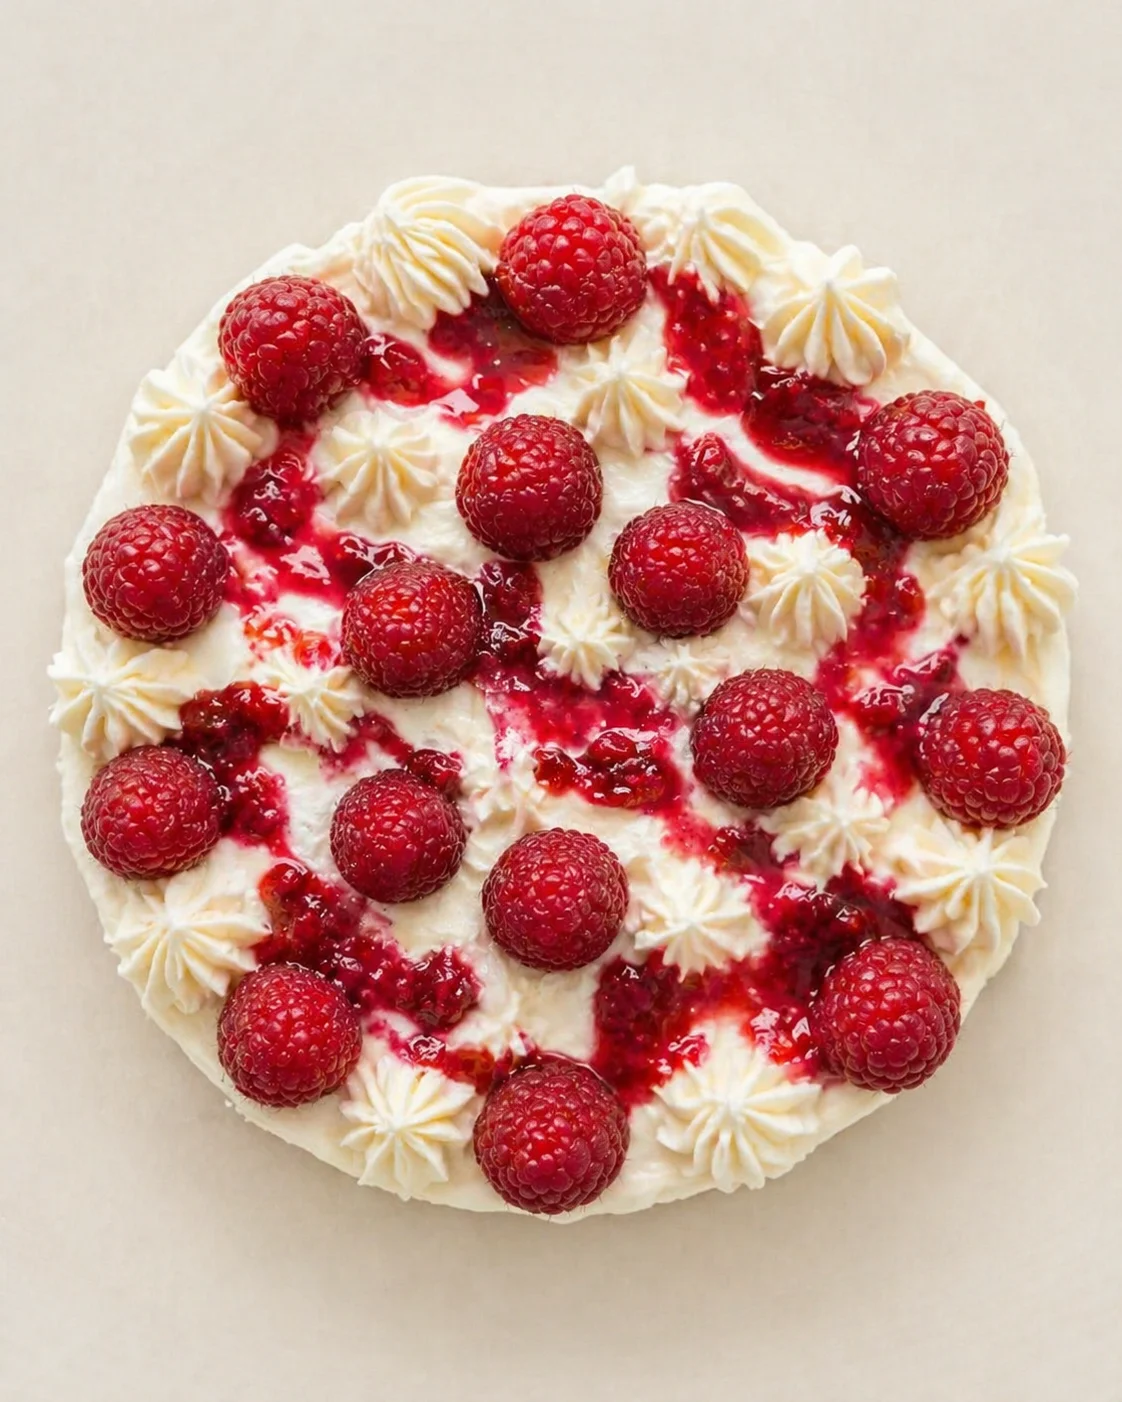
- Optionally drizzle additional melted white chocolate over the cake and arrange fresh raspberries on top.
-
Chill the finished cake 10–15 minutes before slicing to set the frosting.
Tips for a Flawless Cake
- Use room temperature butter, eggs, and milk for smooth mixing and even cake rise.
- Measure your flour by spooning it into your cup and leveling with a knife to avoid dense cake.
- Mix wet and dry just until combined for soft crumb—overmixing makes cake tough.
- Melt white chocolate slowly and stir often to avoid seizing; if it seizes, a teaspoon of oil or cream can help smooth it out.
- Prefer seedless raspberry filling? Push cooked raspberries through a fine sieve before cooling.
- Chill the cake between the crumb coat and final frosting layer for neat, crumb-free results; for a visual guide, see our Cookie Dough Cake (cookie dough baked into each layer).
- Oven temps vary, so start testing your cakes at 22 minutes to prevent overbaking.
- For nice clean slices, chill the cake 30 minutes before cutting and wipe your knife between slices.
Easy Variations and Swaps
- Try other berries: Swap raspberries for strawberries, blackberries, or a mix for a different fruit vibe. Blueberries also work beautifully—see how they shine in these Perfect Blueberry Cheesecake Cookies.
- Chocolate variation: Use milk or dark chocolate for frosting for a richer, slightly less sweet cake. Melt it the same way as the white chocolate.
- Add an almond twist: Stir ½ teaspoon almond extract into your batter or frosting and sprinkle toasted sliced almonds on top for a nutty finish.
- Shortcut Raspberry Jam: Use high-quality seedless raspberry jam instead of cooking fresh. Warm it to loosen before spreading.
- Make cupcakes or loaf cake: Bake as cupcakes (18–22 minutes) or in a loaf pan (bake longer, check with toothpick) for fun smaller or portable treats.
- Gluten-free option: Replace flour with a 1:1 gluten-free blend containing xanthan gum. Texture shifts slightly but flavor stays delicious.
Storage and Make-Ahead Tips
Keep your assembled cake fresh by storing it in an airtight cake carrier or wrapped tightly with plastic wrap in the fridge for up to 3 days. Because it has fresh fruit filling and butter-based frosting, it’s best kept chilled until serving.
Freezing works too! Freeze individual slices tightly wrapped in plastic wrap and foil for up to 2 months. You can also freeze unfrosted layers for up to 1 month, wrapping them well to assemble later. For a fully frosted cake, freeze briefly until the frosting firms, then wrap tightly—it will last up to a month but note the filling texture might change a bit after thawing.
For thawing, leave frozen slices or layers in the fridge overnight. Serve at room temperature for best taste—take it out 30–60 minutes before serving. If you like your cake warm, microwave a slice for a quick 8–15 seconds, checking carefully so frosting doesn’t soften too much.
You can also make parts ahead: bake layers up to 2 days early and store wrapped in a cool spot or the fridge. Raspberry filling and frosting can be made a day before; just bring to room temp and rewhip the frosting before assembling.
Answers to Common Questions
Can I use frozen raspberries? Absolutely! Just thaw and drain them well before cooking. You might need to simmer a bit longer to get the right thickness.
Why did my white chocolate frosting turn grainy? White chocolate can seize if overheated. Melt it gently and cool slightly before mixing into the butter and sugar. If it gets grainy, try chilling and whipping it again or add a teaspoon of warm milk as you beat.
How do I avoid a dry or dense cake? Don’t overbake or overmix. Measure flour properly, use room temperature ingredients, and start checking for doneness a few minutes before time’s up by poking with a toothpick.
Can I make this dairy-free or vegan? You can swap in dairy-free margarine or plant butter, use non-dairy milk, and vegan white chocolate if possible. Egg replacements like flax or commercial egg replacers may work, but texture may shift—try a tested vegan cake recipe for the best results.
How thick should the raspberry filling be? It needs to be thick enough to spread but not runny. Cook until thickened and add a small corn-starch slurry if needed. Make sure it’s totally cool before spreading to stop it from sliding around.
Can I use white chocolate chips instead of bars? Yes, either one works. Bars often melt smoother, but chips are convenient. Chop them evenly to ensure they melt without clumps.
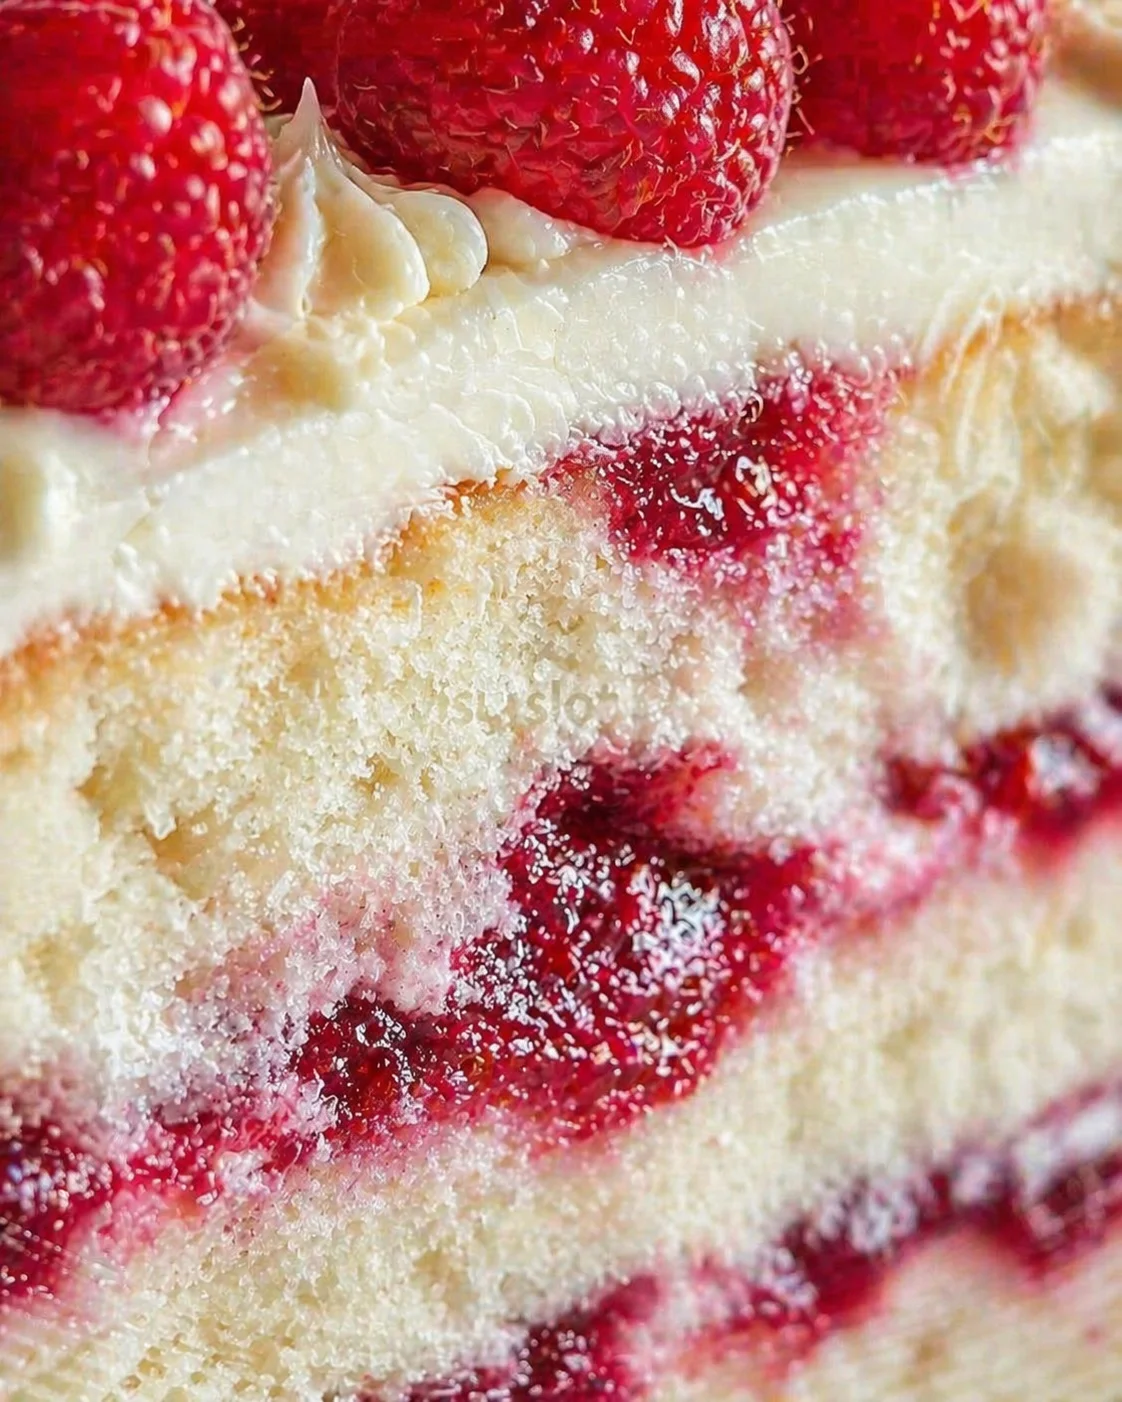
A rich and moist layered cake combining creamy white chocolate frosting with a sweet-tart raspberry filling, perfect for celebrations or special family desserts.
- Prep Time: 20 minutes
- Cook Time: 30 minutes
- Total Time: 50 minutes plus cooling and chilling time
- Yield: 10-12 servings 1x
- Category: Dessert
Ingredients
- 2 cups all-purpose flour
- 1 cup granulated sugar
- 1 cup unsalted butter, softened (for cake)
- 4 large eggs
- 1 teaspoon vanilla extract
- 1 cup milk
- 2 teaspoons baking powder
- 1/2 teaspoon salt
- 2 cups fresh raspberries (or frozen, thawed)
- 1/2 cup sugar (for raspberry filling)
- 1 tablespoon lemon juice
- 8 oz white chocolate, melted and slightly cooled
- 1 cup unsalted butter, softened (for frosting)
- 4 cups powdered sugar
- 2 tablespoons milk (or more if needed)
Instructions
- Preheat oven to 350°F (175°C). Grease and flour two 9-inch round pans and line the bottoms with parchment paper.
- Beat softened butter (1 cup) and granulated sugar (1 cup) until light and fluffy, about 3-5 minutes. Add eggs one at a time, beating well after each. Stir in vanilla extract.
- In a separate bowl, whisk together flour, baking powder, and salt.
- Add dry ingredients to the wet mixture in three parts, alternating with milk, stirring gently after each addition until just combined.
- Divide batter evenly between prepared pans and smooth tops.
- Bake for 25–30 minutes or until a toothpick inserted comes out clean or with a few crumbs.
- Let pans cool 10–15 minutes, then transfer cakes to a wire rack to cool completely.
- For the raspberry filling, combine raspberries, 1/2 cup sugar, and lemon juice in a saucepan. Cook over medium heat, stirring occasionally, until fruit breaks down and mixture thickens, about 5-7 minutes.
- For thicker filling, stir in 1 teaspoon cornstarch mixed with 1 tablespoon cold water; cook for an additional minute. For seedless filling, press mixture through a fine-mesh sieve. Cool completely.
- Melt white chocolate gently and let cool until warm but not hot.
- Beat softened butter (1 cup) until creamy. Gradually add powdered sugar (4 cups), then mix in cooled melted white chocolate. Add milk 1 teaspoon at a time if frosting is too stiff until fluffy and spreadable.
- Level cake tops if domed using a serrated knife.
- Place one cake layer on serving plate. Spread half of the raspberry filling evenly, leaving a small edge. Place second layer on top and press gently to level.
- Apply a thin crumb coat of frosting over the entire cake and chill in refrigerator for 20-30 minutes.
- Apply the final layer of frosting using an offset spatula for smooth sides.
- Optionally drizzle additional melted white chocolate over the cake and arrange fresh raspberries on top.
- Chill finished cake 10-15 minutes before slicing to set frosting.
Notes
Use room temperature butter, eggs, and milk for smooth mixing and even cake rise., Measure flour by spooning into the cup and leveling with a knife to avoid dense cake., Mix wet and dry ingredients just until combined to keep cake crumb soft., Melt white chocolate slowly to prevent seizing; if seized, add a teaspoon of oil or cream to smooth out., Chill cake between crumb coat and final frosting for a neat finish., Start testing cake doneness at 22 minutes to avoid overbaking., For clean slices, chill cake 30 minutes before cutting and wipe knife between slices., Frozen raspberries can be used after thawing and draining; cook longer if needed to thicken filling., White chocolate chips can be used instead of bars, chop evenly for smooth melting., To make the cake dairy-free or vegan, substitute ingredients accordingly but texture may vary.
Nutrition
- Serving Size: 1 slice
- Calories: Approximately 450 calories per serving
- Fat: 22 g per serving
- Carbohydrates: 60 g per serving
- Protein: 6 g per serving
More in Breakfast
The Best Cookies and Cream Cookie Recipe

Key Lime Cookies
Perfect Blueberry Cheesecake Cookies